A girl at work was talking about her daughters birthday cake and how she loves her Zhu Zhu pet so I offered to make a figure of her particular one - Peachy - to go on top of a cake.
I had to do some research to find out what a zhu zhu pet was and in particular what Peachy looked like.
I again made the fondant into gumpaste using CMC powder and then tinted it to an orange/peach colour. I used white fondant to add the legs and snout area and added a small nose which can be oiled up prior to serving to make it look like plastic.
I stuck the ears onto some wire so they inserted into the figure and cut out the peach shape to go on the animal's back.
Saturday, December 10, 2011
2011 - Elephant Figure
In preparation from Thomas' Christening cake I made an elephant topper.
I first did a practice run with basic white gumpaste to make sure I could make something that actually looked like an elephant and when that was a success I moved on to the real deal.
The elephant is white fondant turned into gumpaste using some CMC powder and then tinted grey.
I used an edible marker to add the black details and some black fondant for the eyes. I added a hint of pink to the ears using some petal dust.
All in all I'm pretty happy with the result - now for the giraffe and a lion!
Tuesday, October 18, 2011
Hudson's 2nd Birthday - Lightning McQueen
OCTOBER 2011
The invitations for Hudson's birthday were Disney "Cars" theme so the plan was to do a Lightning McQueen cake.
I had a few pictures and videos on the net as guidance and set about creating something that resembled the car character.
I make 3 slab cakes as the car needed to be quite long. I made 2 x butter cakes (pound cake) and another red velvet which I haven't tried before.
The slabs worked really well and provided a great starting point. I froze them for about a week, defrosting them the night before I needed to start decorating.
I layered the cakes (with red velvet in the middle) with red/pink buttercream flavoured with raspberry essence. I think I might have used a little too much as on its own it tasted a bit strong, but then with all the cake together and fondant it was okay.
The first steps were to carve out the cake and then apply buttercream all over it to keep it together. The carving wasn't too bad but the buttercream (crumb coat) was painful at the front where I had to build up the bonnet sides with extra cake. The buttercake kept coming off with the buttercream and in addition it kept mixing with the pink buttercream filling - not a great look.
The cake went into the fridge and I worked on colouring all the fondant and preparing as many other elements as possible.
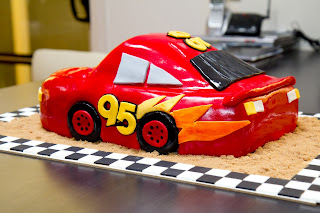
I used pre-coloured red fondant to cover the whole cake. There was a rip at the front so I ended up adding some teeth and mouth area which in the end looked great. I added some intent details and then added the side window panels, the eyes and windscreen and the back window.
I was tossing up between two wheel sizes and probably went with the wrong one. The wheels were made using pre-coloured black fondant which I made into gum paste adding some CMC powder. This would ensure they were harder than normal fondant if left overnight. I scraped out some cake using the same circle cutter as I used for the wheels and folded the red fondant under.
I cut out some yellow 'flames' and painted orange gel paste onto the ends.
White and yellow fondant squares made the front and tail lights.
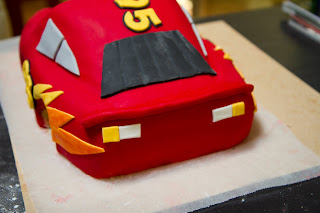
The bonnet disc was tan fondant with orange buttercream piped on with Hudson instead of Rusteze like the movie.
I made numbers using yellow fondant and then traced around them to create slightly bigger black numbers. These were stuck on each side and the roof. A spoiler was added using red fondant.
When all the details, minus wheels, were added to the cake I transferred it to the display cake board. At this time I ended up with some cracking on each side of the windscreen.
I decorated the display board with a black & white grid pattern and some brown sugar to look like dirt. The black and white fondant was rolled then and then cut in even squares before being attached to the board with some decorating jelly. I didn't measure out the squares against the board, just got lucky that it matched pretty much exactly.
The final steps of the cake was to add the wheels. I started by using a skewer through the cake but realised it wasn't necessary as the wheels were a tight fit.
Just prior to taking the cake to the birthday boy I brushed some olive oil onto the cake to create shine. This really make it's character come to life.
Sunday, August 7, 2011
Amanda's 30th birthday - giant cupcake
MAY 2011
This cake was designed to be the centre piece of a cake display where Amanda had a number of cupcakes in the purple/black/silver colour scheme.
Making a giant cupcake sounded easy and when I found a mould at Kmart I jumped on it and thought it'd be smooth sailing.
My first attempt was a dud. So, so hard to get the cakes baking at the same time considering one was a cone shape and the other was much deeper and wider.
My second attempt where I baked the cone first and then the base also failed. I think the pan was the problem - always blame the tools used :-)
My back up plan worked a treat. I used a pudding dish and a small round pan. I carved the cone from the pudding pan and used the round one as the base. It didn't look much un-iced but I knew I could add detail afterwards.
I would like to try baking one of these using a giant cupcake pan from a cake decorating shop. I believe they are made from much thicker metals and probably compensate for the different shapes a bit better.
So, with cake made I went onto decorating.
I used black fondant for the base and then used a skewer to make it look like a patty pan.
I used butter cream for the top. It didn't have to be perfectly smooth because I was covering a lot of it with stars.
I had pre-made all the stars in 3 shades of purple (some medium, some small) with about half on sticks.
I sprinkled non toxic silver glitter all over the top of the cake to fit in with the 'sparkle' theme.
When I'd decorate the cake with enough stars I used the leftovers around the base and wrote on them with an edible marker "Happy Birthday Amanda" and "30".
Monday, April 25, 2011
My 30th Birthday - dog cake
APRIL 2011
Considering I go on about Hamish my Labrador so much at work I thought I should do a cake of him for my birthday.
I made a smallish cake using Mum's pudding tin and then another 2 small round cake tins. The pudding tin was vanilla/chocolate swirl cake using packet mixes and the larger (but still small) cakes were vanilla only.
I put the separate cakes on top of each other and carved out a semi-circle to make the puppy body.
I froze these and then pulled them out a few days later to dirty ice with buttercream (not made with shortening this time). I used my turntable which made things so much easier!
I put the cakes in the fridge to harden up and started to colour some fondant to a tan colour - same as Hamish :-) It took a long time to colour 1kg of fondant!!!!
I finally got there and rolled out the fondant to cover both cakes. I then made the paws and tail in the same colour. The tail needed three toothpicks in it to keep it upright.
I coloured some more fondant a darker brown to add the ears and snout. I needed to enhance the eye area so I added some eyebrows at the last minute too.
I used pre coloured black fondant for the nose and eyes.
I coloured white fondant with blue to create the colour and added some detail for studs.
Ian's 60th Birthday - school bus
APRIL 2011
With Ian's new employment as a school bus driver, how could I resist making a bus cake for his birthday. It had to be a quick and easy one because I was really pushed for time. Luckily I got Kelly to help me out with the accessories.
The cake was made from a vanilla packet mix (Green's brand). I borrowed a loaf tin from my neighbour as standard log tins aren't big enough and I didn't want to make a huge square cake and cut it in half...this was quick remember!
I carved the cake and it didn't really look like a bus. I made a slight change from the slanted windscreen to 90 degrees and it looked a little better. Once carved I covered it in buttercream using shortening (Sno creme from Caroline's Sugar Art).
I coloured white fondant to a great yellow colour and pressed into the shape. I then attached all the accessories.
The side mirrors were held on with florist wire. The tyres were held on with toothpicks. Everything else was attached with a small amount of buttercream.
I placed the cake onto a small platter so that it was raised and the tyres could be placed into the cake. I completed this look by piping green grass all around the cake to cover the platter.
I used an edible marker to add some black detail.
The rest of the accessories speak for themselves - all edible!!!
Ian was quite surprised and loved the cake.
Thursday, March 24, 2011
Jack's 1st Birthday - Jungle animals
MARCH 2011
Kelly did all the baking for these cakes which made my life much easier.
CUPCAKES
When I found the jungle cupcake toppers it was perfect for Jack's birthday.
Kelly and I took about 4-5 hours creating the fondant cupcake toppers a week in advance.
We used templates found on the net and coloured the fondant to suit each element of each animal. www.chicaandjo.com/2009/04/07/zoo-animal-cupcakes
For the lion mane I used a textured roller and for the fine detail work in black I used an edible marker.
I used a craft knife to cut out the shapes and a scone cutter for the lion.
The eyes and small details were quite difficult to get right.
To personalise the cupcakes I created a zebra pattern with white and black fondant. I cut strips of black and rolled it into the white, then cut out letters to make 'Jack'.
'1' CAKE
The idea behind the '1' was to match the invitation.
I cut the two log cakes in half and created a double layer '1'. These were placed onto a silver cardboard and I cut around the shape for stability.
The fondant was chocolate fondant pre made and ready to roll.
The cakes were filled with butter cream using shortening (cocoa added for some flavour). The cakes were covered in buttercream and the chocolate fondant rolled on top.
This was my first time moulding fondant over an odd shape and it wasn't all together bad. I found the chocolate fondant harder to work with than white fondant. It was much stiffer.
The covered cake was placed onto another cardboard for presentation and buttercream used to pipe star shapes all around the base.
The spots were white fondant coloured to match the yellow, green, pink and blue. These were cut in varying sizes using circle shaper cutters.
CREATING THE THEME
To bring the cupcakes alive we used a cake board, covered it in green tissue paper with clear plastic over the top and then added green and yellow cardboard cut to look like long grass.
Wednesday, March 9, 2011
Sarah's 30th Birthday - Artists palette
JANUARY 2011
Sarah's party theme was 'come with your face painted'so it was only fitting she have a cake that represented that same theme.
I made a single tier pound cake with chocolate fudge filling.
For the butter cream I used Sno Creme which provides a much whiter base rather than using butter and it being yellow in colour. Love this and will use it every time now.
I started a couple of weeks in advance making all the accessories. I used pre-made modelling paste to form the brush, bristles, paint circles, the stars and also formed some bottles.
I then found a font I liked and cut out the numbers with wire through them so they would stand up on the cake. Turns out they were a bit too heavy so I needed to put some reinforcement behind them on the day.
I used wire for the stars which probably wasn't thick enough as the stars were a bit too heavy when on the cake.
I searched for edible glitter and all that is around is gelatin so it wasn't the sparkle I wanted. Cake shops also sell glitter that is non toxic but not technically edible. I used this on parts that didn't have to be eaten.
To complete the paint palette I used black fondant and pressed the modelling paste circles into it. I then used gel to make it look like wet paint.
For the bottles, I painted them in edible silver paint and made fondant labels.
For the paint brush, I used non toxix crayon and mixed a brown colour. I painted a small amount in silver and finished with some narrow black strips of fondant.
The entire cake was covered in ivory fondant. I considered zebra print but was concerned it might look too 'busy.
To finish the cake's face paint theme I added freehand splashes of fondant with lustre dust.
Monday, March 7, 2011
Darryl's 60th Birthday
DECEMBER 2010
This was quite a big piece of work.
I ended up using styrofoam for the top layer so I could prepare it ahead of time.
I created fondant balls to look like golf balls and baseballs and set them to the side. I also prepared '60' numbers to paint later on.
The top layer was covered with red fondant and black fondant to resemble a stage (both pre coloured from Caroline's Sugar Art). I then added edible silver balls one by one and fixed the toy drum set with wire. I painted the numbers with edible silver paint.
I tried making gum paste balls but didn't find that I could keep the shape as well. They set completely hard so would have been better in the long run as the fondant balls were a bit sticky after being in a container. Should have left them out in the air.
The bottom cake is rick chocolate cake (Green's packet mix). It took 3 mixes to fill the 30cm pan.
I put wet tea-towels around the cake tin which helps the cake to rise evenly.
I did a test run to find out how long the large cake needed to cook for so the actual cake worked well.
I cut the top off to level and then cut it in half. I think I filled it with buttercream and covered it in ivory fondant. I placed black fondant over the top.
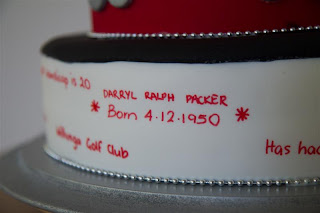
I personalised the cake with all the hobbies Dad has or has had and information about his accomplishments and life. The balls were placed into the cake with toothpicks.
The cake was displayed on a silver painted lazy susan.
This was quite a big piece of work.
I ended up using styrofoam for the top layer so I could prepare it ahead of time.
I created fondant balls to look like golf balls and baseballs and set them to the side. I also prepared '60' numbers to paint later on.
The top layer was covered with red fondant and black fondant to resemble a stage (both pre coloured from Caroline's Sugar Art). I then added edible silver balls one by one and fixed the toy drum set with wire. I painted the numbers with edible silver paint.
I tried making gum paste balls but didn't find that I could keep the shape as well. They set completely hard so would have been better in the long run as the fondant balls were a bit sticky after being in a container. Should have left them out in the air.
The bottom cake is rick chocolate cake (Green's packet mix). It took 3 mixes to fill the 30cm pan.
I put wet tea-towels around the cake tin which helps the cake to rise evenly.
I did a test run to find out how long the large cake needed to cook for so the actual cake worked well.
I cut the top off to level and then cut it in half. I think I filled it with buttercream and covered it in ivory fondant. I placed black fondant over the top.
I personalised the cake with all the hobbies Dad has or has had and information about his accomplishments and life. The balls were placed into the cake with toothpicks.
The cake was displayed on a silver painted lazy susan.
Subscribe to:
Posts (Atom)