Thursday, October 31, 2013

Baby Group First Birthday

OCTOBER 2013


I saw a cute idea somewhere for a group baby cake - just had to wait until they turned 1 to make it.  I was really happy with how this one turned out.  So cute!

I started ages ago making the baby figures.  The idea was to replicate a group photo we took when they were about 7 months old.  I tried to match the colours to what they were wearing and also the poses (as much as I could).  There was one baby missing from the photo so I had to add him into the line-up.

I started with the bodies.  After I'd made a few I realised I was adding their arms a different way to usual and it didn't look as good, but it was too late to change now.  Oh well, I'm sure the babies will forgive me. I also made up little name blocks for each child, but I didn't mix enough of some colours so the blocks weren't all the same size.  Rookie mistake :-(


All lined up and ready for heads.  (I had to tell the Mums not to read anything into the head and body sizes if they were slighting bigger or smaller - this was not intentional)

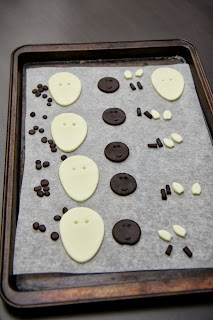
Adding the heads was great.  It really brought the babies to life.  I didn't go too fancy, just some white fondant tinted with skin tone colouring, a small ball for a nose, eyes added with edible marker and mouth indented using a piping tip.  There are 3 babies with ethnic backgrounds and I didn't want to offend anyone by making them all white so I added a small amount of chocolate fondant to these heads just to add a subtle difference.

Three of the babies had hats on in the photo so I replicated them as well.  Just love the hat with ears!

So the babies were nearly finished!  I added hair using a garlic press.  It's really hard to create a blonde effect and I didn't want to go yellow so I used a skin coloured fondant.  The curls coming out from under the cap are a favourite :-)

The cake itself needed to be long enough for all 9 babies so I baked 2 rectangle cakes in vanilla and chocolate.  (Caroline's Sugar Art hire tins for $5) I cut these down the middle to create 2 cakes with 2 tiers.  I used Greens moist vanilla and chocolate cake packet mixes which were delicious - will be using them again.  I filled them with the icing from the packets.

FYI - there aren't any cake boards big enough for this size. I used some cardboard offcuts to put under the cake itself and had my husband cut down some cupboard backing we had lying around from a previous IKEA purchase for the presentation board.  Bit rough on the edges but did the job.

The cake was covered in a light green buttercream and had a green fondant strip to replicate the grass.  I was meant to use a textured roller before putting it onto the cake but I forgot.  I used my Wilton ribbon cutter and it worked perfectly.  I might just be getting the hang of that thing!

I used a grass piping tip and darker green icing to edge all around the cake and where the photo was going to stick out like a banner.

Last thing to do was to create some lettering.  I used FMM tappits in Fancy and added some glitter,  positioned it all in place and wallah....done.

I handed over the babies to the respective parents on the day :-)


Sunday, October 20, 2013

Haylee's baby shower

OCTOBER 2013


There was no doubt that an owl theme was required for Haylee's baby shower.  It wasn't a huge gathering but I still wanted to do a cake for her.  In the end there was so much other food we didn't even cut it on the day, but I'm hoping the dad and mum-to-be enjoyed it on their own.

The cake itself was a chocolate cake with chocolate icing filling (the Better Homes & Garden one I've used before....yum)  The cake mix I used was a new Betty Crocker Indulgence one so I'll be interested to know how it tasted.

I made the gumpaste owls early on.  It was harder than I thought to work out how to get them looking good.  It seems you can go 'modern/contemporary owl' or 'traditional owl'.  I decided on the modern touch.


I covered the cake in buttercream and let it rest so it would form a crust but because it was so hot it didn't really happen.  Should have left it in the fridge overnight.  When I was smoothing down the fondant the buttercream was oozing out the bottom.

I tried my hand at frilling - still need a LOT more practice - and piped a border in purple.  I was going for a 2-toned effect but in the end just blended the white and purple together.  Also rolled out lengths of chocolate fondant to make a nest for the Mummy and baby owl to sit in.  This was topped with some small green fondant hearts.


I created some fondant buttons using a mould and added them to the top for a simple, clean look.


All in all I was happy with the result.


Zoe's First Birthday - ladybug cake

OCTOBER 2013


For Zoe's first birthday I didn't want to go too overboard - has to better each year right?  I found some themed items that I used as the basis for the decorations and the cake....


The top tier was once again a fake tier so I could make it earlier.  I covered a foam circle with light pink fondant and used skewers as support for the banner.  Spotty straws slotted straight over the skewers and were finished with some pink fondant.  The banner itself was gumpaste on wire which was pushed through the straws to stay in place.  This picture shown here is my first attempt which wasn't the right colour purple.  I made a couple more (as back up) in a lighter lilac tone.


The lettering is FMM brand in ''funky".

I tried using cereal treats for my sculpting of the ladybug body to save money on the fondant.  It was much easier than I thought and easy to cover in buttercream and fondant.


.

Up till now I could make things in advance, but once the top layer was finished I had to wait until it was party-time.  The final touches to the top layer were vertical stripes.  I used the perspex rulers instead of the Wilton ribbon cutter this time.  I actually think I prefer it this way, but maybe just need more practice with the roller.


The cake portion (bottom tier) was a 12inch chocolate mud cake filled with chocolate icing and covered in buttercream and white fondant.  I used pink spots to tie into the napkins. plates. etc.  On reflection the spots should have been larger.  Also, the fondant was thicker than usual as I'd hurt my back and couldn't roll it thin enough.

I also added some green leaves under the ladybug.  These were piped using buttercream using the Wilton leaf tip. 

I covered the board with white fondant this time and added some green buttercream stripes.  I thought adding green checkers (per the napkins) would be too overpowering for the cake.
This cake fed approx 70 people.


Friday, September 20, 2013

Jungle theme baby shower

SEPTEMBER 2013

This is another customer requested cake which is pretty exciting for me.  It's a repeat theme but still complicated nonetheless, particularly with a nearly 1 year old to work around.

With a few cakes to do during October I had to plan them all in parts that I could do during day sleeps (my daughters not mine!).  This first one up was some cupcake toppers as well as a cake.  I designed the cake to be a fake top tier so that part could be developed well in advance.

CUPCAKES - I didn't need to bake the cupcakes this time...woohoo - just provide the decorations.
The request was for monkey, lion, giraffe and zebra.  The client brought the cupcakes to me on the day, I piped some green leaves on and positioned the topper.

These were really quite quick to make - unlike the first time I did jungle faces!  I used cutters for almost all of the components.

I started with biggish ears but then changed them to a smaller size which looked a lot better.  I added small black fondant eyes for all the animals once they were completed.


Monkey done, now for the others.....


An easter egg cutter was perfect to get the head shape. 

(whoops, forgot an 'after' shot of the zebra)


THE CAKE
This is chocolate cake with chocolate icing for filling and dark chocolate ganache on the outside.  Haven't used ganache this way before...I'm unconvinced.

The brief was to make it bright and have animals on it so I set about making the animal figures early;


 The idea was to have them positioned like this, but I changed my mind once I'd made the bottom tier.


When I moved the 2 animals off the top tier it really needed something to add more interest, so I piled on palm tree leaves in varying shades of green.  These colours were used for leaves to decorate the base board too.


Thursday, July 18, 2013

Paris theme cake

JULY 2013

BIGGEST CHALLENGE YET!!!

I was approached by friends to make a cake for a surprise 50th birthday.  They provided a picture they'd seen which was the inspiration and I made the modifications requested.

Firstly, the Eiffel Tower......  I did some research of how other people had made their towers.  Some looked good and others quite shocking.  Initially the girls were going to buy a statue but I really wanted to give it a go in gumpaste.  I showed them the end result and gave them the option to use it or not.  Hence, I started the tower part about 3 months in advance.

The one in the picture provided was royal icing but I haven't had too much experience with that and it seemed quite delicate so I decided to use gumpaste.  Initially I cut out 4 sides to the tower and tried to stick them together using black royal icing and adding a bend into them at the same time.  I used cotton wool to help keep their shape but it was a failure.  More research and a plan that seemed foolproof later, I had my end result which I was extremely happy with.

I used a paper template to get the size I wanted and then broke it down into 3 parts.  Each section (top, middle and bottom) was made using 4 individual sides left to dry then pieced together using black royal icing and an extra piece of square gumpaste to keep it in shape and for extra stability.

I was then left with 3 sections I could 'glue' together using the royal icing.  At this stage it wasn't perfect looking so I rolled out some black fondant and covered each side so it had a really good smooth surface.  I also added the top spire and the balconies.  From here I piped white royal icing on for the lights.


One of the client requests was for the cake to have 3 layers in black, pink and white.  To achieve this I made 3 sponges for each tier in chocolate, vanilla tinted pink and vanilla (bottom tier shown below).  When the cake was cut into it had a great effect, BUT it was much more time consuming than I thought it would be.


Back to decorating......

I put the top tier together first by levelling each layer and stacking them with raspberry flavoured pink buttercream.  I covered the whole thing in the same buttercream before laying light pink fondant over the top.  Black, white and darker pink dots were cut using round cutters and placed onto the cake using a dab of water. (Next time I think I'd leave off the fondant layer and just stay with buttercream)


The same process was done with the bottom tier but using vanilla flavoured white buttercream and white fondant.  I also needed to add in some supports so the bottom tier wouldn't be weighed down by the top tier. 


The stripes for the bottom tier were made using a Wilton ribbon cutter.  I hadn't used it before so I do need more practice, but it helped to achieve the desired effect.  


To complete the cake I added a gumpaste ribbon made earlier, some sparkly numbers and piping at the base of the top tier.  The tower was placed on top once delivered.

I was really happy with the end result but also happy it was finished!