Thursday, July 18, 2013

Paris theme cake

JULY 2013

BIGGEST CHALLENGE YET!!!

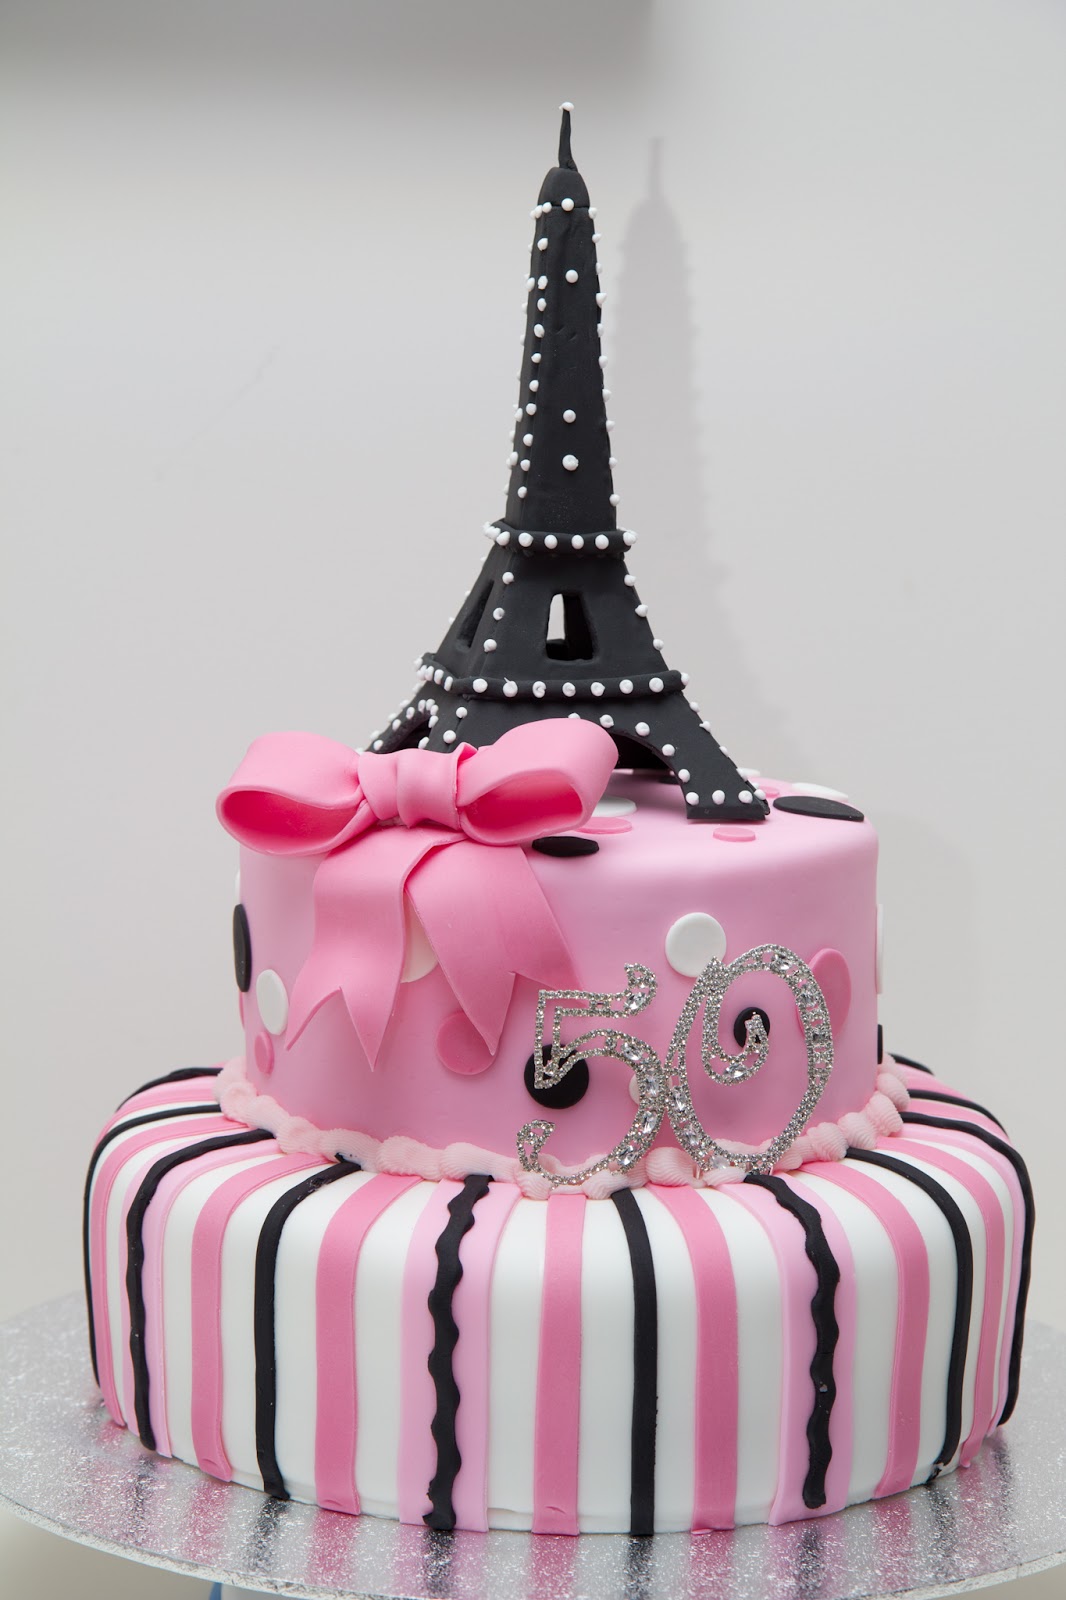
I was approached by friends to make a cake for a surprise 50th birthday.  They provided a picture they'd seen which was the inspiration and I made the modifications requested.

Firstly, the Eiffel Tower......  I did some research of how other people had made their towers.  Some looked good and others quite shocking.  Initially the girls were going to buy a statue but I really wanted to give it a go in gumpaste.  I showed them the end result and gave them the option to use it or not.  Hence, I started the tower part about 3 months in advance.

The one in the picture provided was royal icing but I haven't had too much experience with that and it seemed quite delicate so I decided to use gumpaste.  Initially I cut out 4 sides to the tower and tried to stick them together using black royal icing and adding a bend into them at the same time.  I used cotton wool to help keep their shape but it was a failure.  More research and a plan that seemed foolproof later, I had my end result which I was extremely happy with.

I used a paper template to get the size I wanted and then broke it down into 3 parts.  Each section (top, middle and bottom) was made using 4 individual sides left to dry then pieced together using black royal icing and an extra piece of square gumpaste to keep it in shape and for extra stability.

I was then left with 3 sections I could 'glue' together using the royal icing.  At this stage it wasn't perfect looking so I rolled out some black fondant and covered each side so it had a really good smooth surface.  I also added the top spire and the balconies.  From here I piped white royal icing on for the lights.


One of the client requests was for the cake to have 3 layers in black, pink and white.  To achieve this I made 3 sponges for each tier in chocolate, vanilla tinted pink and vanilla (bottom tier shown below).  When the cake was cut into it had a great effect, BUT it was much more time consuming than I thought it would be.


Back to decorating......

I put the top tier together first by levelling each layer and stacking them with raspberry flavoured pink buttercream.  I covered the whole thing in the same buttercream before laying light pink fondant over the top.  Black, white and darker pink dots were cut using round cutters and placed onto the cake using a dab of water. (Next time I think I'd leave off the fondant layer and just stay with buttercream)


The same process was done with the bottom tier but using vanilla flavoured white buttercream and white fondant.  I also needed to add in some supports so the bottom tier wouldn't be weighed down by the top tier. 


The stripes for the bottom tier were made using a Wilton ribbon cutter.  I hadn't used it before so I do need more practice, but it helped to achieve the desired effect.  


To complete the cake I added a gumpaste ribbon made earlier, some sparkly numbers and piping at the base of the top tier.  The tower was placed on top once delivered.

I was really happy with the end result but also happy it was finished!


Sunday, July 14, 2013

Wilton Cake Decorating Course 1

JULY 2013

I decided to learn some 'right' ways to do cake decorating and attend Wilton course 1 at Creative Cooks.

All cake decorating courses seem to be quite expensive to me, so I was glad that I did actually pick up some tips.  I haven't done much piping work before so it was good to learn how to do flowers and writing with icing.  We also ran through covering a cake properly and used some new tools to make the process easier.

After the 4 weeks we put it all together into a cake, here's my final product.


Thursday, July 4, 2013

Mothers Day Cupcake Bouquet

MAY 2013

I've seen cute rose bouquets made from cupcakes and thought I'd give it a go. Mothers Day seemed the perfect opportunity. There seemed to be a few different ways to do it, but I didn't have much time so I did take some shortcuts.

 I started with chocolate cupcakes in green swirl patty pans. I ran out of brown patty pans which would have been better to disguise as 'dirt', but oh well. Some of the others I've seen have chocolate ganache smeared over the Styrofoam ball but I didn't bother.

First technique - adding filling
I wanted to try adding a filling to the cupcakes so I used an apple corer to create the holes (saw this done on Cupcake Wars a fair bit) and poured some ganache into the hole. Wouldn't use ganache again as it set fairly hard and didn't have an oozy effect. Am doing some more tonight actually and trying a rich chocolate frosting.

Second technique - multi coloured icing 
I was going to be piping roses so I wanted to have a natural looking effect where it wasn't a solid colour. I used pink and peach and it turned out ok but not as much definition as I would have liked.

 Third technique - piping a rose 
I bought a Wilton 1M tip and read up a bit on how it should be done. I was really happy with the results

Final hurdle - assembly 
Well, this was much harder than I thought. I had a small pot and pushed a styrofoam ball into it. I first tried with half of a bigger ball and glued it, but I couldn't get it to work. A smaller ball that could fit in snuggly did the trick.

 I started with bamboo skewers to attach the cakes but ended up finding toothpicks better. I poked the bottom of the cupcake first to get through the patty pan and then pushed the cakes onto toothpicks embedded into the ball. I worked around ball being very careful to keep the balance.

 In the end I had to settle for a smaller bouquet as I couldn't get a full circle bouquet - they kept falling off. Might try icing the cakes after they are attached next time...just a thought. Would also take the time to make fondant leaves instead of using tissue paper.

 Here's the results:

Fireman Sam

JUNE 2013

My first Customer...woo hoo!

One of the girls from my 'day job' wanted a cake for her son's birthday and I was excited about having a Customer. Don't get me wrong, I love making cakes for family and friends, but there's also something special about a 'random' person acknowledging your work.

She provided me with a picture she liked the look of; had to feed 25, chocolate cake, 1 layer round. I did some research on other options for lettering, layout, figure placement and came up with a mix between her idea and some other cool things within my skill range.

 I started the Fireman Sam figure a couple of weeks in advance. To cut a long story short, I made up my colours of gumpaste in yellow, navy, skin colour and tan. I watched a few YouTube clips on how to create a person and set about assembling him.

My first man was a bit fat (not really satisfactory for a fireman!) so I took off the torso and did it again. Problem was that I'd already cut the arms so they are a little shorter than I would have liked. I also should have added a neck piece. The face was quite slender but sank a bit as it dried. I was happy with the eyes, ears and the hat.

The cake itself was a chocolate cake (Donna Hay) and the filling was Better Homes & Gardens chocolate icing which is delicious! I let the chocolate cool a bit too much so it ended up with small choc chips through it.


I made a number '4' from gumpaste with wire so it would stand in the cake. I also made gumpaste red stars and letters to be attached vertically at a later stage. As a last minute idea I made a ladder and it's my favourite part of the cake.

I rolled out a length of black fondant and added a hose nozzle at the end, painted silver.  This lapped around the entire base and up onto the top.

Done!


Wednesday, January 16, 2013

Kerrie's 60th - Flower cake

JANUARY 2013

There are quite a few new techniques and products tried in the making of this cake. The cake itself is a chocolate sponge cake from Caroline's Sugar Art. I only needed one packet to make the 2 cakes which were so light and fluffy - that could have been partly due to my new KitchenAid which does an amazing job.


With the cakes done and in the freezer I set about making flowers and butterflies while my baby was sleeping. I used Bakels Pettinice purple fondant and Satin Ice baby pink fondant from Caroline's Sugar Art. I added some black and pink colouring to the baby pink to create the deeper pink colour. I added some CMC powder to make them into gum paste so they would set hard.


The filling is cookies n cream. It was pretty quick and easy to make and tasted delicious! Highly recommend it.


I covered the entire cake in chocolate ganache. Probably needed to be thicker as it made quite a mess.


I used 'The Mat' to roll out the fondant. Not sure if I love it yet - need more practice. I then sprayed it with a pink lustre spray. It took a little practice to get it even but I love the finished product. From there I added fondant balls and flowers around the base and placed on all the details.


I gave the whole cake a final light spray of lustre. Really happy with the finished product and it was tasty!

Tuesday, January 15, 2013

Hudson's 3rd Birthday - Peppa Pig

OCTOBER 2012

There was a request made for Peppa Pig, but because I was going to be about 9 months pregnant, there was no chance of me making a Peppa figure - I might not have even made it to the birthday! The plan was to make cupcake toppers that could be made in advance and here's the result - made using coloured fondant for Peppa Pig, Mr Dinosaur, Number "3" and Hudson's name.

Christmas 2012

Over this Christmas period I've made a few different cupcakes.

BITESIZE SNOWFLAKE

My favourite are these small bitesize ones (perfect to eat while breastfeeding). Basic vanilla cupcake with vanilla buttercream and fondant decorations using circle and snowflake cutters. Small amount of glitter on the snowflakes (non toxic of course).

RUDOLPH & SANTA

These are sooo cute. Using a vanilla cupcake in xmas print patty pan, I piped on vanilla buttercream using a star tip to look kind of like snow. I sprinkled coconut onto a few of them but it didn't really add much so left the others plain. I saw Santa falling into the cake at a bakery so thought I'd steal the idea. Made the Santa legs using red, white and black fondant and poked them into the cupcakes with toothpicks. Rudolph was made using a silicone mould with red, chocolate and tan fondant(chocolate lightened with white fondant.

SNOWFLAKE

Chocolate sponge cupcakes in cute paper wrappers with vanilla buttercream piped on with a large round tip. I added large white fondant snowflakes. Too easy!